![]()
まっちーの仮想化講座
第24回:これでクラウド環境の構築も大丈夫
- Unified Archivesを活用したクローンインストール 2 -
2015年8月11日
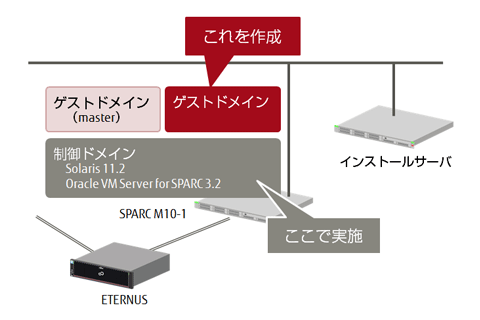
前回はマスター環境のアーカイブの作成とインストールサーバの設定を行いました。今回はこれらを用いて、クラウド環境を想定した仮想環境の構築を行いたいと思います。
今回は、以下の全体の流れのうち、③~④までをご紹介します。
![]()
![]()
![]()
![]()
![]()

![]()
ドメインの作成
まずはクローン環境を作るための仮想環境(ゲストドメイン)を作成します。
今回は、マスターとなるゲストドメインと同じ物理サーバ上に作成しますが、Unified Archives機能を用いる場合、異なる物理サーバ上にも作成することができます。
これまでの連載で既にドメインの作成方法はご紹介していますので、Oracle VM Server for SPARCの管理コマンド(ldmコマンド)で作成してもいいのですが、ここでは簡単にドメインを作成できるツールをご紹介したいと思います。
Configuration Tool for Oracle VM Server for SPARCは、Oracle VM Server for SPARCの作成を対話形式で行うことができるツールで、こちらからダウンロードできます。ldmコマンドの使い方を知らなくても、簡単にOracle VM Server for SPARC環境を作成できます。
Configuration Tool for Oracle VM Server for SPARCをダウンロード後、任意のディレクトリに解凍し、実行します。
primary# ./Start_config.sh
=======================================================================================
The Configuration Tool for Oracle VM Server for SPARC [ver.2.2]
=======================================================================================
Menu
1. Create a logical domain configuration.
2. Initialize the settings of the logical domain configuration.
q:quit
---------------------------------------------------------------------------------------
Please select (1-2,q) ==> 1
ここからは、特長的な項目だけをピックアップしてご紹介します。
こちらはCPUの設定画面です。CPUは既に何コア使われていて、残りは何コアあることが表示されます。今回の例だと既に3ドメイン構築されていて、それぞれが2コア、合計6コア使われていて、残りが10コアであることがわかります。この残りのコア数の範囲で設定するCPUコア数を指定します。
メモリも同様に既に使われている容量と空いている容量が表示されます。
=======================================================================================
2.Configure a Guest Domain [Original]
=======================================================================================
# CPU cores [2/8]
Assign CPU cores to the domain svl-01.
### Current CPU allocation for each domain ###
Domain Cores
----------------- -----
primary 2
ldom00 2 ←使用済みのCPUコア数
ldom01 2
-----------------------
The quantity of CPU cores that can be allocated to the guest domain: 10 ←未使用のCPUコア数
t:top menu q:quit
---------------------------------------------------------------------------------------
Enter the quantity of CPU cores for the guest domain svl-01. [1] ==> 2 ←割り当てるCPUコア数を指定
こちらは仮想ネットワーク(vnet)の設定画面です。仮想ネットワークは、制御ドメインに構築済みの仮想スイッチ(vsw)を表示し、どの仮想スイッチに割り当てるかを選択することができます。また、VLANやIPMPの使用可否も選択することができます。
仮想ネットワークの他に、仮想ディスク、仮想コンソールも設定することができます。
=======================================================================================
2.Configure a Guest Domain [Original]
=======================================================================================
# Virtual Network [4/8]
Do you wish to create a virtual network (vnet)?
t:top menu q:quit
---------------------------------------------------------------------------------------
Create a virtual network? ([y]/n) ==> y
Enter the quantity of virtual networks. [1] ==> 1
=== Set the 1st vnet configuration: vnet0 ===
Please select a virtual switch for vnet0 from the following list:
1. primary-vsw0 : aggr0 was allocaded.
2. primary-vsw2 : net2 was allocaded.
Enter a number ==> 1
Set a VLAN for vnet0? (y/[n]) ==> n
Enable IPMP for vnet0? (y/[n]) ==> n
=== The following virtual network setting will be set ===
VNET : vnet0: virtual switch is primary-vsw0
VNET : vnet0: VLAN disabled
VNET : vnet0: IPMP disabled
---------------------------------------------------------------------------------------
Please press the enter key.
最後に全設定項目のサマリーが表示されて、この構成のドメインを作成します。
=======================================================================================
2.Configure a Guest Domain [Original]
=======================================================================================
The following I/O domain configuration will be set.
======= Your configuration information for guest domain svl-01 =======================
Domain : svl-01
Host ID: Set automatically
CPU : 2 cores for the guest domain svl-01.
CPU : The parameter of "max-cores" disabled.
Memory : 8192 MB for the guest domain svl-01.
-------------------------------------------------------------------
VNET : vnet0: virtual switch is primary-vsw0
VNET : vnet0: VLAN disabled
VNET : vnet0: IPMP disabled
VDISK : vdisk0: the service name is primary-vds0
VDISK : vdisk0: the volume name is svl-01-vol0
VDISK : vdisk0: no option
VDISK : vdisk0: the disk file is /dev/dsk/c0t600000E00D000000000103E1001C0000d0s2 (DISK) [boot-disk]
VC : the virtual console concentrator is primary-vcc0
VC : the port number is 5201
OBP : svl-01: auto-boot?=false
OBP : svl-01: boot-device=vdisk0
-------------------------------------------------------------------
Install: Network-based installation
=======================================================================================
This tool makes a configuration file that can be used to create a domain with the
configuration shown above.
Save this configuration file? If no, the configuration will be cleared. (y/n) ==> y
The configuration file (/opt/ovm/OVM_ConfigTool/conf/svl-01-150612105345.sh) was saved.
Do you wish to create the domain now with this configuration file? (y/n) ==> y
Creating the domain with the configuration file (/opt/ovm/OVM_ConfigTool/conf/svl-01-150612105345.sh).
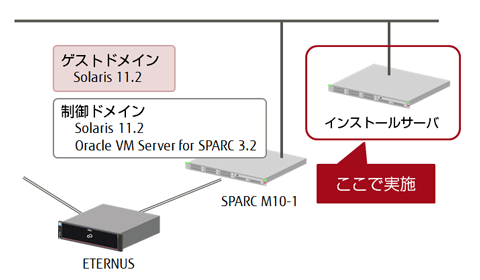
ldm listコマンドで指定した通りにドメインが作成されているかを確認します。
primary# ldm list -l svl-01
NAME STATE FLAGS CONS VCPU MEMORY UTIL NORM UPTIME
svl-01 inactive ------ 4 8G
・・・省略・・・
AIマニフェストの作成と登録
次はインストールサーバでAIマニフェストを作成します。
ひな形が用意されていますので、それをコピーします。
インストールサービスは、デフォルトでは/export/auto_install/<インストールサービス名>配下に作成されます。今回はこのディレクトリにAIマニフェストを作成します。
また、前回(第23回)で作成したアーカイブも同じディレクトリ配下に配置しています。
なお、このディレクトリはHTTPでアクセスできる必要があります。
inst-srv# # cp /usr/share/auto_install/manifest/default_archive.xml \
> /export/auto_install/s11_2/s11_2_master.xml
今回はこのように編集しました。
inst-srv# cat -b /export/auto_install/s11_2/s11_2_master.xml
1
・・・省略・・・
9
10
11
12
・・・省略・・・
53
54
55
・・・省略・・・
63
64
65
作成したAIマニフェストをインストールサービスに登録します。その際、このマニフェストを使用するクライアントを限定するために、-cオプションでMACアドレス条件を指定します。
また、-nオプションでインストールサービス名を、-fオプションで先ほど作成したAIマニフェストを指定します。
inst-srv# installadm create-manifest \
> -n s11_2 -f s11_2_master.xml -c mac=00:14:4f:fb:b5:d4
Created Manifest: 's11_2_master'
設定内容を確認します。
inst-srv# installadm list -m
Service Name Manifest Name Type Status Criteria
------------ ------------- ---- ------ --------
default-sparc orig_default derived default none
s11_2 s11_2_master xml active mac = 00:14:4F:FB:B5:D4
orig_default derived default none
あとは、システム構成プロファイルを作成する必要があります。これはシステム構成ツールを使用して作成しますが、今回はここまでにしたいと思います。
次回は構成プロファイルを作成し、実際にインストールしてみたいと思います。
応援メッセージはtwitterにて、ハッシュタグ #fjsparc![]() までお願いします。
までお願いします。