![]()
まっちーの仮想化講座
第15回:物理サーバからOracle VMに簡単移行
2012年11月20日
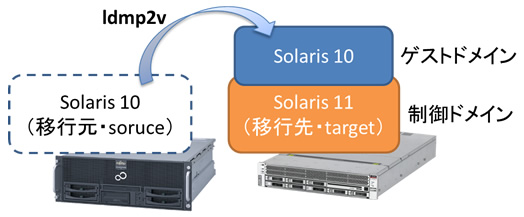
これまで、Oracle Solaris ゾーンの機能として、物理環境から仮想環境への移行方法をご紹介しましたが、Oracle VM Server for SPARCにも同様な機能を提供するPhysical to Virtual(P2V)ツールがあります。そこで今回はOracle VM Server for SPARCのP2V機能(ldmp2v)を用いた仮想環境への移行方法をご紹介したいと思います。
今回は以下の図のようにSolaris 10のシステムをSolaris 11上のゲストドメインに移行します。
ここでは、Oracle VM Server for SPARC 2.2を使用しています。
ldmp2v移行概要
ldmp2vツール(Oracle VM Server for SPARC Physical-to-Virtual 移行ツール)を用いた仮想環境への移行作業は、大きく3つのフェーズに分けることができます。
- 収集フェーズ(Collection phase)
移行元環境のファイルシステムイメージ(アーカイブ)を作成します。 - 準備フェーズ(Preparation phase)
収集フェーズで収集したデータや予め作成する定義ファイルを元に、移行先システムにゲストドメインを構築します。 - 変換フェーズ(Conversion phase)
移行先ゲストドメインのOSをアップグレードします。
ldmp2vツールでは、移行元環境をそのまま移行するのではなく、移行先サーバがサポートするOS版数(注1)にアップグレードする必要があります(注2)。
(注1)移行先サーバがSPARC T4の場合、Solaris 10 8/11以降
(注2)移行元がSolaris 8やSolaris 9の場合、Solaris 10にアップグレードが必要です。
| 移行元(source) | 移行先(target) | |
|---|---|---|
| 収集フェーズ | ||
| 準備フェーズ | ||
| 変換フェーズ |
収集フェーズ
ldmp2vツールは、Oracle VM Server for SPARC Softwareに含まれています。移行元システムにldmp2vツールがインストールされていない場合、移行先システムからコピーするか、個別にSUNWldmp2vパッケージをインストールする必要があります。
今回は、移行先システムからコピーし、移行元システムの/usr/sbin配下に配置しました。
target# ls -l /usr/sbin/ldmp2v
-rwxr-xr-x 1 root sys 15507 Oct 23 09:08 /usr/sbin/ldmp2v
収集フェーズでは、移行元システムのアーカイブをldmp2vツールによって作成します。
ここでは、アーカイブを移行先システムに直接保存するため、移行先システムのディレクトリをNFSマウントします。
source# mount -F nfs 192.168.10.74:/export/share /mnt
source# df -h
・・・省略・・・
192.168.10.74:/export/share
57G 31K 57G 1% /mnt
ldmp2vツールを使用し、移行元システムのアーカイブを作成します。
source# ldmp2v collect -d /mnt/s10archive
Collecting system configuration ...
Archiving file systems ...
Full Flash
Checking integrity...
Integrity OK.
Running precreation scripts...
Precreation scripts done.
Creating the archive...
9459273 blocks
Archive creation complete.
Running postcreation scripts...
Postcreation scripts done.
Running pre-exit scripts...
Pre-exit scripts done.
準備フェーズ
ここからは移行先での作業になります。まずは収集フェーズで作成したアーカイブを確認しましょう。
一つのマニュフェストファイルとFlashアーカイブが作成されています。
target# ls -lh /export/share/s10archive/
total 9466425
-rw-r--r-- 1 root root 470 Oct 23 08:30 manifest
-rw-r--r-- 1 root root 4.5G Oct 23 08:30 s10-01.flar
このほかに、定義ファイルを用意する必要があります。ひな形が用意されていますので、/etc配下にコピーし、移行先環境に合わせて編集します。
target# cp /opt/SUNWldmp2v/etc/ldmp2v.conf.sample /etc/ldmp2v.conf
ここでは、「BACKEND_PREFIX」の値をrpool/export/s10p2vに変更しました。この値は仮想ディスクのバックエンド(実体)を作成する位置を指定します。
また、設定する仮想サービス(VSW/VDS/VCC)は予め作成しておく必要があります。
target# vi /etc/ldmp2v.conf
・・・省略・・・
# Virtual switch to use
VSW="primary-vsw0"
# Virtual disk service to use
VDS="primary-vds0"
# Virtual console concentrator to use
VCC="primary-vcc0"
# Location where vdisk backend devices are stored
BACKEND_PREFIX="rpool/export/s10p2v" ← 「tank/ldoms」(デフォルト値)から変更
# Default backend type: "zvol" or "file".
BACKEND_TYPE="zvol"
# Create sparse backend devices: "yes" or "no"
BACKEND_SPARSE="yes"
# Timeout for Solaris boot in seconds
BOOT_TIMEOUT=60
では、ldmp2vツールを使用して、ゲストドメインを作成します。
target# ldmp2v prepare -d /export/share/s10archive s10p2v
Creating vdisks ...
Resizing partitions ...
Creating file systems ...
Populating file systems ...
9459273 blocks
Modifying guest OS image ...
Unmounting file systems ...
Creating domain ...
Attaching vdisks to domain s10p2v ...
作成されたゲストドメインを確認しましょう。
仮想ディスクや仮想ネットワークなどが自動で作成されていることがわかります。
target# ldm ls -l s10p2v
NAME STATE FLAGS CONS VCPU MEMORY UTIL UPTIME
s10p2v inactive ------ 8 2G
UUID
e206cdd4-c13e-e1e1-a9ed-bb182e42e481
CONTROL
failure-policy=ignore
extended-mapin-space=off
cpu-arch=native
DEPENDENCY
master=
CORE
COUNT: 1
MEMORY
SIZE: 2G
CONSTRAINT
threading=max-throughput
VARIABLES
boot-device=disk0:a
NETWORK
NAME SERVICE ID DEVICE MAC MODE PVID VID MTU LINKPROP
vnet0 primary-vsw0 0 00:14:4f:fb:70:5e 1
DISK
NAME VOLUME TOUT ID DEVICE SERVER MPGROUP
disk0 s10p2v-vol0@primary-vds0 0
変換フェーズ
変換フェーズでは、移行先のゲストドメインのOSをアップグレードする必要があります。そのための媒体として、インストールサーバかOSのISOイメージが必要になります。
ここでは、/ISO配下に配置したISOイメージを用いてSolaris 10 8/11にアップグレードします。
target# ldmp2v convert -i /ISO/Sol10u10.iso -d /export/share/s10archive s10p2v
Testing original system status ...
LDom s10p2v started
Waiting for Solaris to come up ...
Select 'Upgrade' (F2) when prompted for the installation type.
Disconnect from the console after the Upgrade has finished.
Trying 0.0.0.0...
Connected to 0.
Escape character is '^]'.
Connecting to console "s10p2v" in group "s10p2v" ....
Press ~? for control options ..
Using RPC Bootparams for network configuration information.
Attempting to configure interface vnet0...
Skipped interface vnet0
Setting up Java. Please wait...
Serial console, reverting to text install
Beginning system identification...
Searching for configuration file(s)...
Search complete.
Discovering additional network configuration...
この時点でゲストドメインのコンソールに接続しています。
これ以降は、OSインストール時のような対話形式で値を入力し、アップグレードインストールを行います。
Select a Language
0. English
1. Brazilian Portuguese
2. French
3. German
4. Italian
5. Japanese
6. Korean
7. Simplified Chinese
8. Spanish
9. Swedish
10. Traditional Chinese
Please make a choice (0 - 10), or press h or ? for help: 5
・・・以降省略・・・
アップグレードインストールし、再起動するとログインプロンプトが表示されます。
これで、ldmp2vツールを用いた物理環境から仮想環境への移行は完了です。
なお、今回は特にオプションを指定しないで、デフォルト設定のままで実施しましたが、実際に使用する際には、Oracle VM Server for SPARC Softwareの「Oracle VM Server for SPARC ガイド」も参照して、必要なオプションを設定してくださいね。
(注)「Oracle VM Server for SPARC ガイド」には、ldmp2vツール(Oracle VM Server for SPARC Physical-to-Virtual 移行ツール)は、Solaris 11では未サポート機能、という記載がありますが、現在は制御ドメインがSolaris 11の場合もご利用いただけます。
また、オラクル社のドキュメントも参照してください。
Oracle VM Server for SPARC Documentation![]() (オラクル社webサイトへリンク)
(オラクル社webサイトへリンク)
応援メッセージはtwitterにて、ハッシュタグ #fjsparc![]() までお願いします。
までお願いします。