![]()
Solaris活用ナビ ~Practical Tips for SPARC~
第4回:Puppetを使ったSolaris環境の構築自動化
2017年12月26日
近年ではプライベートクラウド等で多くの仮想環境を構築するケースが増えてきました。その多くが同じような環境の構築であるため、設定手順を自動化したいと考えている方も多いかと思います。SolarisにはAIインストーラーというすぐれた自動構築ツールがありますが、残念ながらLinux等の他のOSでは使用できないため、OSが混在している環境での統合的な管理には向いていません。
そういった場合にはDevOps系のツールが非常に役立ちます。今回はSolarisで利用できるPuppetを使った構築自動化例をご紹介したいと思います。
Solaris上のPuppetについて
PuppetはPuppet Labs社が開発した設定管理ツールです。そのオープンソース版にSolaris向けの機能拡張を加えたものが、Oracle Solaris11.2からOSのリポジトリに含まれて配布されています。Puppetに関しては詳しくは説明しませんので、以下を参照してください。
Solaris版のマニュアルは以下を参照してください。
扱うことのできるリソースタイプはpuppet describe --listコマンドで確認可能です。
# puppet describe --list
These are the types known to puppet:
address_object - Manage the configuration of Oracle Solaris ad ...
address_properties - Manage Oracle Solaris address properties
augeas - Apply a change or an array of changes to the ...
boot_environment - Manage Oracle Solaris Boot Environments (BEs)
computer - Computer object management using DirectorySer ...
cron - Installs and manages cron jobs. Every cron re ...
dns - Manage the configuration of the DNS client fo ...
etherstub - Manage the configuration of Solaris etherstub ...
exec - Executes external commands. Any command in an ...
file - Manages files, including their content, owner ...
filebucket - A repository for storing and retrieving file ...
group - Manage groups. On most platforms this can onl ...
host - Installs and manages host entries. For most s ...
interface - This represents a router or switch interface. ...
interface_properties - Manage Oracle Solaris interface properties
ip_interface - Manage the configuration of Oracle Solaris IP ...
ip_tunnel - Manage the configuration of Oracle Solaris IP ...
ipmp_interface - Manage the configuration of Oracle Solaris IP ...
k5login - Manage the `.k5login` file for a user. Specif ...
ldap - Manage the configuration of the LDAP client f ...
link_aggregation - Manage the configuration of Oracle Solaris li ...
link_properties - Manage Oracle Solaris link properties
macauthorization - Manage the Mac OS X authorization database. S ...
mailalias - Creates an email alias in the local alias dat ...
maillist - Manage email lists. This resource type can on ...
mcx - MCX object management using DirectoryService ...
mount - Manages mounted filesystems, including puttin ...
nagios_command - The Nagios type command. This resource type i ...
nagios_contact - The Nagios type contact. This resource type i ...
nagios_contactgroup - The Nagios type contactgroup. This resource t ...
nagios_host - The Nagios type host. This resource type is a ...
nagios_hostdependency - The Nagios type hostdependency. This resource ...
nagios_hostescalation - The Nagios type hostescalation. This resource ...
nagios_hostextinfo - The Nagios type hostextinfo. This resource ty ...
nagios_hostgroup - The Nagios type hostgroup. This resource type ...
nagios_service - The Nagios type service. This resource type i ...
nagios_servicedependency - The Nagios type servicedependency. This resou ...
nagios_serviceescalation - The Nagios type serviceescalation. This resou ...
nagios_serviceextinfo - The Nagios type serviceextinfo. This resource ...
nagios_servicegroup - The Nagios type servicegroup. This resource t ...
nagios_timeperiod - The Nagios type timeperiod. This resource typ ...
nis - Manage the configuration of the NIS client fo ...
notify - Sends an arbitrary message to the agent run-t ...
nsswitch - Name service switch configuration data
package - Manage packages. There is a basic dichotomy i ...
pkg_facet - Manage Oracle Solaris package facets
pkg_mediator - Manage Oracle Solaris package mediators
pkg_publisher - Manage Oracle Solaris package publishers
pkg_variant - Manage Oracle Solaris package variants
protocol_properties - Manage Oracle Solaris protocol properties
resources - This is a metatype that can manage other reso ...
router - Manages connected router.
schedule - Define schedules for Puppet. Resources can be ...
scheduled_task - Installs and manages Windows Scheduled Tasks. ...
selboolean - Manages SELinux booleans on systems with SELi ...
selmodule - Manages loading and unloading of SELinux poli ...
service - Manage running services. Service support unfo ...
solaris_vlan - Manage the configuration of Oracle Solaris VL ...
ssh_authorized_key - Manages SSH authorized keys. Currently only t ...
sshkey - Installs and manages ssh host keys. At this p ...
stage - A resource type for creating new run stages. ...
svccfg - Manage SMF service properties with svccfg(1M) ...
tidy - Remove unwanted files based on specific crite ...
user - Manage users. This type is mostly built to ma ...
vlan - Manages a VLAN on a router or switch.
vni_interface - Manage the configuration of Solaris VNI inter ...
vnic - Manage the configuration of Oracle Solaris Vi ...
whit - Whits are internal artifacts of Puppet's curr ...
yumrepo - The client-side description of a yum reposito ...
zfs - Manage zfs. Create destroy and set properties ...
zone - Manages Solaris zones.
zpool - Manage zpools. Create and delete zpools. The ...
個々のプロバイダーに関してもpuppet describe <タイプ名>で確認してください。以下はzfsタイプの例です。
# puppet describe zfs
zfs
===
Manage zfs. Create destroy and set properties on zfs instances.
**Autorequires:** If Puppet is managing the zpool at the root of this zfs
instance, the zfs resource will autorequire it. If Puppet is managing any
parent zfs instances, the zfs resource will autorequire them.
Parameters
----------
- **aclinherit**
The aclinherit property. Valid values are `discard`, `noallow`,
`restricted`, `passthrough`, `passthrough-x`.
- **aclmode**
The aclmode property. Valid values are `discard`, `groupmask`,
`passthrough`.
(途中略)
- **xattr**
The xattr property. Valid values are `on`, `off`.
- **zoned**
The zoned property. Valid values are `on`, `off`.
Providers
---------
zfs
Puppetはサーバ・クライアント方式をとっておりサーバ側をmaster、クライアント側をagentと呼んでいます。Solarisではmasterとagent共にSMFの管理下に置かれています。起動・終了はsvcadmコマンドを用いて行います。
構成について
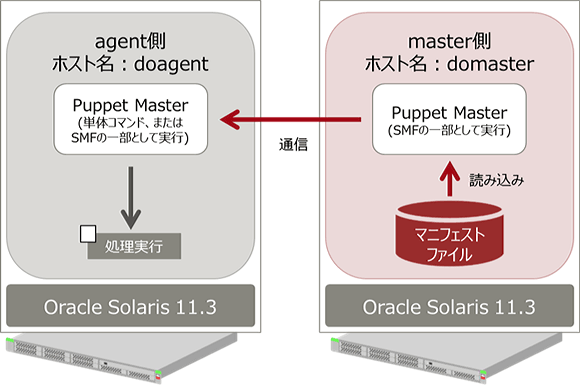
サーバとクライアントの2台のマシンを用意します。Oracle VM for SPARCでドメインを構築しても問題ありません。
今回はホスト名をmaster側がdomaster、agent側がdoagentとし、/etc/inet/hostsに登録しておきます。
確認はOracle Solaris11.3 SRU 22.3で行っています。
Puppetの環境設定
Puppetのインストール
Puppetはmasterとagentの2種類の運用形態がありますが、インストールするパッケージとしてはひとつだけsystem/management/puppetのみとなります。必要なパッケージは一緒にインストールされます。
# pkg install system/management/puppet
masterの設定
Linux版等のpuppetはpuppet.confという環境設定ファイルを編集しますがSolaris版はSMFに統合されている関係でSMFのプロパティを編集する形で環境設定します。SMFサービスは/etc/puppet配下にpuppet.confファイルを自動的に作成するため、このファイルを手動で編集しないようにしてください。
最初にmasterが動くホストを指定します。ここで指定するホスト名はagentとの暗号通信の証明書と関係するため、ホスト名で統一するようにしてください。ホスト名とIP アドレス指定が混在した場合、通信が出来ません。
# svccfg -s puppet:master setprop config/server=domaster
設定が終われば、svcadmでサービスを起動します。
# svcadm enable puppet:master
起動が完了するまで1~2分ほどかかります。svcsコマンドで確実にonlineになるのを確認してください。起動中は*offlineと表示されます。
# svcs puppet:master
STATE STIME FMRI
online 10:44:52 svc:/application/puppet:master
agentの設定
masterと同様にSMFのプロパティを編集します。
# svccfg -s puppet:master setprop config/server=domaster
agentからmasterへ接続のテストを行います。このときに--serverオプションでmasterのホスト名を指定します。
# puppet agent --test --server domaster
初回は認証の問題で以下のようなメッセージが出て失敗します。
Info: Creating a new SSL key for ansible
Info: Caching certificate for ca
Info: csr_attributes file loading from /etc/puppet/csr_attributes.yaml
Info: Creating a new SSL certificate request for ansible
Info: Certificate Request fingerprint (SHA256): BA:77:44:4B:B0:33:04:B9:AC:08:9F:9B:BF:9C:6A:CC:E8:D1:6A:06:AE:73:1F:14:16:B4:4F:9F:83:70:31:FA
Info: Caching certificate for ca
Exiting; no certificate found and waitforcert is disabled
masterに対して証明書の要求が行われますので、master側で認証を行います。まず、未処理の証明書要求を確認します。
# puppet cert list
+ "doagent" (SHA256) DB:A0:20:26:94:DA:EF:76:05:E8:C9:27:C8:6F:3D:EB:E1:90:D6:83:51:39:C6:A8:3A:EA:7B:D5:71:6D:CC:82
agentの証明書に署名します。
# puppet cert sign doagent
agentからmasterに再度接続テストを行い、正常に通信が出来ることを確認します。
# puppet agent --test --server domaster
Info: Caching certificate for doagent
Info: Caching certificate_revocation_list for ca
(中略)
Info: Applying configuration version '1503534351'
Info: Creating state file /var/lib/puppet/state/state.yaml
Notice: Finished catalog run in 0.08 seconds
Puppetの基本的な使い方
マニフェストの作成
Puppetはマニフェストと呼ばれるファイルに設定内容を記述します。
基本的な書式は以下の通りです。
<リソースタイプ> { '<タイトル>':
<パラメーター> => <値>,
}
詳しくは以下を参照してください。
以下はagent側にユーザー 'testuser' を追加するマニフェスト例です。マニフェストはmaster側の/etc/puppet/manifest配下に置きます。マニフェストのファイル名はsite.ppという名前にします。
user { 'testuser':
ensure => 'present',
gid => '100',
home => '/export/home/testuser',
uid => '1001',
}
マニフェストの実行
master側で以下のコマンドを実行し、マニフェストの中身を反映させます。エラーが発生した場合は、/var/log/puppet/puppet-master.logにエラー内容が書き出されます。
# puppet apply -v /etc/puppet/manifests/site.pp
agent側で以下のコマンドを実行します。エラーが発生した場合は、/var/log/puppet/puppet-agent.logにエラー内容が書き出されます。
# puppet agent --onetime --server domaster
'testuser'でログインが正常にできれば成功です。
Puppetの応用例:Zone環境の自動構築
ここでは使用例としてNon-Global Zone(以下NGZ)を自動的に構築する方法をご紹介します。
準備
マニフェストだけでもNGZをある程度は構築できますが、完全自動化というわけには行きません。今回は構築後のユーザー設定まで含めて自動化を行います。
この例ではzone configファイルとsc_profileファイルをテンプレートとして準備して構築を行います。
※注意:Oracle VM Server for SPARCのドメインで構築を行う場合、以下のようにしてゲストドメインのvnetに対してNGZのvnic用のmac アドレスを付与してください。
# ldm set-vnet alt-mac-addrs=auto
以下がzone configファイルのテンプレートです。%{zonename}はプロバイダーのパラメーターから取得しています。dedicated-cpuのCPU数は変数化してマニフェストから取得するようにしています。
create -b
set brand=solaris
set zonepath=/zones/%{zonename}
set ip-type=exclusive
set autoboot=false
add dedicated-cpu
set ncpus=<%= @ncpus %>
end
add anet
set linkname=net0
set lower-link=auto
set configure-allowed-address=true
set link-protection=mac-nospoof
set mac-address=auto
end
以下がsc_profileファイルです。sysconfigコマンドで作ります。ホスト名を<%= @nname %>、IPアドレスを<%= @ip %>、デフォルトルーターを<%= @defaultroute %>として変数化してマニフェストから取得するようにしています。
テンプレートファイルはmaster側の/etc/puppet/modules/<モジュール名>/templates配下に置きます。今回はモジュール名をzoneとし、zone configファイルをmyzone.cfg、sc_configファイルをmyzone_sc.xmlとして保存します。マニフェストに記載するときは<モジュール名>/<ファイル名>となることに注意してください。
マニフェストの作成
マニフェストの内容は以下の通りです。
node 'doagent' {
$sc_conf = '/tmp/myzone_sc.xml'
$zone_conf = '/tmp/myzone.cfg'
$nname = 'myzone'
$ip = '10.20.98.127/24'
$defaultroute = '10.20.98.1'
$ncpus = '1'
file { $sc_conf :
mode => 666,
owner => root,
group => root,
content => template('zone/myzone_sc.xml'),
ensure => 'present'
}
->
file { $zone_conf :
mode => 666,
owner => root,
group => root,
content => template('zone/myzone.cfg'),
ensure => 'present'
}
->
zone { $nname :
config_profile => $sc_conf,
zonecfg_export => $zone_conf,
name => $nname,
ensure => 'running'
}
}
node default {
}
以下解説です。
node 'doagent' {
ホスト名がdoagentのマシンでのみ実行します。
$sc_conf = '/tmp/myzone_sc.xml'
$zone_conf = '/tmp/myzone.cfg'
この例ではいったんzone configファイルとsc_profileファイルをagent側にコピーして参照するようにしています。この部分ではzone configファイルとsc_profileファイルのコピー先での一時ファイル名を指定しています。以下含めて変数名は任意です。
$nname = 'myzone'
$ip = '10.20.98.127/24'
$defaultroute = '10.20.98.1'
$ncpus = '1'
Zone名、IPアドレス、デフォルトルーター、割り当てCPU数を設定しています。
file { $sc_conf :
mode => 666,
owner => root,
group => root,
content => template('zone/myzone_sc.xml'),
ensure => 'present'
}
->
file { $zone_conf :
mode => 666,
owner => root,
group => root,
content => template('zone/myzone.cfg'),
ensure => 'present'
}
agent側にファイルをコピーします。その際にテンプレートの変数部分が設定値に変更されます。
zone { $nname :
config_profile => $sc_conf,
zonecfg_export => $zone_conf,
name => $nname,
ensure => 'running'
}
agent側に作成したファイルを使用してNGZを作成します。この例ではNGZがrunningの状態になるよう処理を行います。
node default {
}
すべてのノードに適用する設定内容を記述します。このエントリーが無い場合、puppet applyでエラーが発生します。
マニフェストの実行
「Puppetの基本的な使い方」を参考にマニフェストの実行を行います。
バックグラウンドでNGZの作成が行われます。今回の例では数分間かかります。以下のようにzoneadmコマンドで状況を確認してください。myzoneのSTATUSがrunningになれば完成です。
# zoneadm list -vc
ID NAME STATUS PATH BRAND IP
0 global running / solaris shared
1 myzone running /zones/myzone solaris excl
STATUSがrunningになったらNGZにログインして正常に使用できることを確認してください。
Puppetの定期実行
puppetのagentもSMFサービスとして登録されていますので、サービスをonlineにすることで定期実行が可能です。
以下のコマンドでpuppet agentのサービスの状態を確認します。最初はdisabledになっています。
# svcs puppet:agent
STATE STIME FMRI
disable 10:14:52 svc:/application/puppet:agent
設定が終われば、svcadmでサービスを起動します。
# svcadm enable puppet:agent
svcsコマンドで確実にonlineになるのを確認してください。
# svcs puppet puppet:master
STATE STIME FMRI
online 10:44:52 svc:/application/puppet:agent
30分毎に最新のマニフェストの内容が実行されます。
以上Puppetの使用例を解説してきましたが、いかがだったでしょうか。
他にもPuppetにはいくつかの機能があります。機会があればまたそれらの使用例をご紹介したいと思います。